Easter Round Panel Crafting Template
As the season of renewal approaches, creators and small business owners alike begin searching for fresh ways to capture the spirit of spring. The Easter Round Panel, Crafting Template offers a sophisticated solution for those looking to elevate their seasonal decor beyond standard flat cutouts. This digital multilayer layout is not merely a file; it is a blueprint for creating depth, texture, and visual interest using modern fabrication tools. Whether you are a hobbyist with a home laser cutter or a professional running a CNC router, this design provides the structural integrity and aesthetic charm necessary for high-quality finished products.
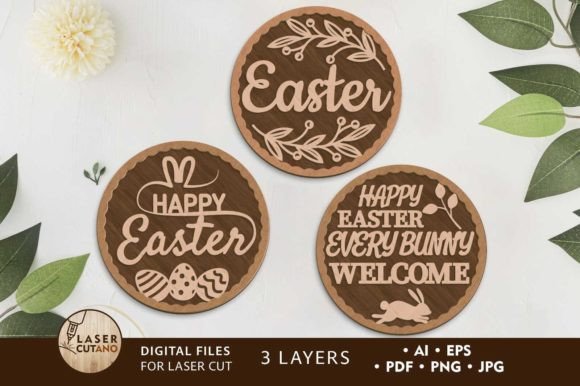
The appeal of this template lies in its versatility and precision. Designed specifically for machines like Glowforge, xTool, and traditional CNC routers, the files are optimized to minimize waste and maximize detail. By utilizing a three-layer construction, the final piece achieves a 3D effect that stands out on mantels, tabletops, or retail displays. It transforms simple materials into intricate art, bridging the gap between digital design and tangible craftsmanship.
Understanding the Multilayer Design Advantage
Many entry-level laser projects rely on single-layer cuts, which can sometimes appear flat or unfinished. The Easter Round Panel, Crafting Template addresses this by employing a multilayer approach. Each of the three layers serves a specific purpose, contributing to the overall silhouette and shadow play of the piece. When assembled correctly, these layers create a sense of dimensionality that mimics hand-carved wood or complex papercraft, but with the consistency and speed of machine production.
The design features charming Easter motifs, likely incorporating elements such as eggs, rabbits, or floral patterns, arranged within a circular frame. This round format is particularly effective for wall hangings and centerpieces, as it draws the eye inward and fits naturally into various interior design styles. The interplay between the positive space (the material) and the negative space (the cutouts) allows light to pass through, creating dynamic shadows that change throughout the day. This attention to detail ensures that the final product feels premium and thoughtfully designed, rather than mass-produced.
Material Selection and Machine Compatibility
One of the strongest assets of this crafting template is its adaptability across different materials and thicknesses. While the design works ideally with conventional plywood, specifically poplar plywood for its clean burn lines and light color, it is not limited to wood. The files are compatible with MDF, acrylic, plexiglas, metal, cardboard, and heavy paper. This flexibility allows creators to tailor the final look to their specific brand or home aesthetic.
- Plywood: Best for a rustic, natural look. Poplar is recommended for laser cutting due to its low resin content, which reduces charring.
- Acrylic and Plexiglas: Ideal for modern, glossy finishes. These materials catch light beautifully and are durable for outdoor or high-traffic areas.
- Cardboard and Paper: Perfect for prototyping or creating lightweight, cost-effective decorations for events and classrooms.
- Metal: For industrial-chic decor, though this requires specific CNC or fiber laser capabilities.
The recommended material thickness ranges from 3 mm to 6 mm (approximately 1/8 inch to 1/4 inch). This range is crucial because it ensures the layers stack neatly without becoming too bulky or too fragile. If you choose to scale the design up, the structural integrity generally remains sound. However, caution is advised when reducing the size. Smaller scales can compromise the thin elements of the design, making them prone to breaking during weeding or assembly. Always test cut a small section if you plan to significantly alter the original dimensions.
Practical Applications for Creators and Businesses
The utility of the Easter Round Panel, Crafting Template extends far beyond personal home decor. For entrepreneurs and small business owners, this file represents a scalable product opportunity. During the spring season, demand for unique, handmade gifts surges. These panels can be sold as standalone wall art, incorporated into larger wreath designs, or used as bases for personalized monograms. Because the files are digital, there is no inventory cost until a sale is made, allowing for a lean business model.
Educators and community leaders can also benefit from this design. In a classroom setting, assembling these panels can teach students about geometry, layering, and fine motor skills. Using cardboard or thick paper makes the project affordable and safe for younger participants, while still delivering a impressive visual result. For marketers and event planners, these panels serve as excellent photo props or branded signage. By painting the layers in brand colors or thematic pastels, businesses can create cohesive visual experiences for spring promotions or Easter events.
Assembly and Finishing Techniques
Achieving a professional finish requires more than just cutting the files. The assembly process is where the magic happens, and following best practices can significantly enhance the final appearance. Since each layer of the multilayer model is glued together, alignment is key. Use registration marks if available, or carefully align the edges before applying adhesive. A slow-drying wood glue or clear craft adhesive works well, allowing time for adjustments.
A critical recommendation for any multilayer project is to paint before gluing. Trying to paint the nooks and crannies of an assembled 3D object is frustrating and often results in uneven coverage. By painting each individual layer beforehand, you ensure complete coverage and can even use contrasting colors to highlight the depth between layers. For example, painting the back layer a dark charcoal and the front layer a soft cream creates a striking visual contrast that emphasizes the laser-cut details.
Additionally, consider sanding the edges of wood or acrylic pieces lightly after cutting to remove any burn marks or roughness. This small step elevates the tactile quality of the piece, making it feel smoother and more refined in the hand. For acrylic users, flame polishing or using a specialized solvent can restore clarity to the cut edges, ensuring the transparency of the material is maintained.
Maximizing Efficiency with Digital Files
For those using machines like Glowforge, the provided SVG files are optimized for ease of use. Layered SVGs allow software to recognize different cut lines and engrave areas automatically, reducing setup time. This efficiency is vital for professionals who need to produce multiple units quickly. The "Easter 3D SVG" structure means that color-coding in your design software can correspond directly to power and speed settings in your laser controller, streamlining the workflow from screen to machine.
Moreover, having access to high-quality "laser cut files" means you are not starting from scratch. Designing intricate, balanced multilayer patterns requires significant skill and testing. By utilizing a pre-tested template, you bypass the trial-and-error phase, ensuring that your first cut is as successful as your hundredth. This reliability allows you to focus on customization, marketing, and customer engagement rather than troubleshooting design flaws.
In conclusion, the Easter Round Panel, Crafting Template is a valuable asset for anyone looking to create high-impact seasonal decor. Its thoughtful design, material versatility, and ease of assembly make it suitable for a wide range of applications, from personal hobbies to commercial enterprises. By paying attention to material selection and finishing techniques, creators can produce stunning, professional-grade pieces that celebrate the beauty of spring with precision and style.